26 November 2014

Something New and lots of old!

Hi!

I'm doing another round up post of the last few Daring Cardmakers cards from the last few weeks.
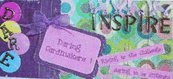
The dare this week it's Lythan's 'Something Old, Something New', here's my card:


I used three new things and three old things. The new were a Kaisercraft stamp which I stamped in grey and then over stamped the flower bits with silver, the background I made with a Hero Arts ink dauber in pastel mint which I'm currently addicted to and the last something new is the paper at the bottom which is from Pink Paislee Merry and Bright collection and was an off cut from my Christmas mini book making. The old are the sequins, the dove is a sequin too they've been in my stash forever because there were like 400 in a packet and the little holly die cut I think came from a craft swap a long time ago.


This next card was Kathy's candle dare and I made my candles with washi tape and little bits of thread at the tops for the 'wick' bits. I went with the neutral colours as I figured it was a good keep in card because you can give that to anybody.


Last one is from my November colour dare which was to use a mix of metallic. I made the rose gold using a red metallic rub on wax over the top of a gold paper die cut, ( Docrafts Xcut feather dies). The circle is from the Silhouette store, it was one of the free shapes of the week ones. I cut it out in white and then gilded it with faux gold leaf. The holly bits are hand cut out and I added some Prima Say it in Crystals as the berries, the top ones I painted over with some Nails Inc nail polish which is a rose gold glitter and you can't really tell from this photo but the leaves are covered with silver leaf at the top and the bottom ones are gold glitter.

x Leo

31 October 2014

Eye Boggling Adventure

Hi!

This week on Daring Cardmakers Nat has challenged us to create a card with googly eyes. Check out the dare and all the cards this week here, http://daringcardmakers.blogspot.co.uk/2014/10/its-eye-boggling.html

Here's my card for this week:


I didn't have any googly stick on eyes to use and Nat said to do something with any kind of wacky eyes so I thought about what I could do and after a bit of thinking I got to Minions and how they're eyes are all buggy and goggled so my card has goggly eyes instead of googly!

I cut out the Minions from a .png image and used the Trace feature in Silhouette Studio. I had to select and cut out the pieces on the inside, like the eyes, goggles, hands feet and clothes and save them as individual images to add to Silhouette Studio to Trace and cut out. I decided to make them into Christmas Minions so they have Christmas outfits and they're busy putting up decorations and being a  bit mischeivous as Minons tend to be. :)
The stickers, (lights and baubles) are all old Echo Park ones and the papers are Kesi-Art, (background) and American Crafts, (clothes).

Don't forget to add your card to the Daring Cardmakers blog if you have a go this week. Big welcome too to Dawn who's joined us as a full time Daring Cardmaker design team member!


26 September 2014

First Christmas cards!

Hi!

For the last couple of Daring Cardmakers weeks I've started to make Christmas cards. This week the dare is to create a card inspired by an 'autumnal forest'. When I jotted down the dare on my to do list last week I wrote down 'forest inspired' and I just got into my head the idea of creating some silver Silver Birch trees in a forest so the card's ended up a bit more wintry but hey ho.


I made all the cuts with my Silhouette using a mixture of clipart and hand drawn images and it's just regular old silver mirror card. I wanted to keep the look fairly minimal with the silver and white so I added the greeting on with acetate. The greeting was just printed on and then I've wrapped it around the card front panel so it's slightly popping up away from the card front too. If I was to do the card again I think I'd maybe emboss the white background too just to add something extra to it. 

Here's the card for last weeks stencil challenge. I used some Silhouette cuts again from my own drawings and used the negative bit as the stencil. I used some of those metallic wax rub ons both to do the stenciling and to colour the cut outs.


Don't forget to check out the Daring Cardmakers challenges every Friday, http://daringcardmakers.blogspot.com

x Leo

16 August 2014

A whole bunch of Daring Cardmakers cards!

I've not updated here in a while so I've got quite a few cards to add! 
I'll start with newest first and work down. This one is for this week's Daring Cardmakers,  http://daringcardmakers.blogspot.co.uk/ which is Jo's challenge to create a card with elastic bands. Jo's suggested using loom bands but I didn't have any of those to use so went around to see if I could scrounge together some regular elastic bands. I ended up with a couple of different widths, mainly the chunky red ones you get on the post. On Pinterest there are a few ideas for stamping with elastic bands and so I decided to use them that way rather than using it directly on a card. I fixed the bands around a clear block in various different patterns and tried it out first on scrap paper. One of the patterns looked like candles so that triggered the idea to just make them into candles. I inked each band on the block in different colour inks, (chalk inks worked the best) and then stamped on the card twice to make the line of 'candles'. The top flame part I used a home made eraser stamp, just carving a bit of an eraser into a flame shape and then stamping it. The greeting stamp is a Lawn Fawn called 'Grand Greetings'. 


This one is from the week before and Kathy's Beach hut dare. I've got a brand new Quirky Kit bundle to use and these are all beachy papers so I went right to those to create a simple beach hut design all made with my paper trimmer. This could easily be translated to a new home or Christmas card, (gingerbread houses?) too.


This one was the colour combo dare for August which you can see here was all blues and purples.
Going through all my scraps purple is not a colour that I could find a lot of. I did find a little bit of cardstock so decided to make kind of double layer greeting. It's just a word die cut, (Memory Box) then that was cut with a circle die, (Xcut) and then another circle of the same size in the turquoise cardstock was cut out. These were then layered together with foam pads. The background is all stamped with two different stamps I found out in mys clear stamp stash. They're from different sets but I mixed the lead and the flower/swirly bit together. I don't know what they are because they're not in the original packets.


This last one was from Lythan's dare which was to create a 'Kathy style' card, http://daringcardmakers.blogspot.co.uk/2014/07/creating-kathy-style.html
I went with a 'classic Kathy' flower. It's a die which is my first purchased Sizzix Bigz die, (Camellia). I did see a YouTube of someone using one in a Cuttlebug who made it look easy but it's not you need a bit of muscle power! I used the middle bit of the die to make a kind of pom pom flower and different combination of the sizes to create the other two. I love how Kathy write to 'just scrunch up the paper' to make the 'Kathy' flowers and when I did that mine just looked screwed up!
The background was stamped, clear embossed then watercoloured over the top with an extra swirly bit, (like Kathy's die cut swirls!) handpainted and cut out.


x Leo

27 June 2014

Two cards & two ideas

Hi!

Last week on Daring Cardmakers the challenge set by Gez was all about doodling. Now to do half way decent doodling you need to start off with half way decent pens and right now I don't have any! For sure I need to invest in some new ones. I've got to that stage where the few I've got are dried out and scratchy on the paper. So looking around at what else I could doodle with I spotted some nail varnish on my desk. It's a kind of chartreuse green colour and I thought, what a good colour that would be for painting flowers and then, ta da. I though why not 'doodle' with the nail polish?

I started off with the flower glued down to the card and then just built up the doodling around it just dotting on the nail colour like you do with nail art. It ended up kind of like a doily design and a little bit folk arty:


This week the challenge was set by Miri to create a card with no scissors. What a challenge it was too! It's second nature just to reach for the scissors so I kept having to stop and think what I was doing. I ended up using stamps and created a mask with a torn off bit of washi tape to make a 'faux panel' for the greeting.


The diecuts are ready made acetate ones by Maya Road, (from the current Quirky Embellishments kit) that I've added some gold leaf to the backs of and then a MME badge embellishment with gold thread glued behind it. (both from a Quirky Kit too).

Don't forget to check out Daring Cardmakers every week there's a new challenge and they're perfect to keep your crafty head busy!
x Leo

23 May 2014

More Daring Cardmakers Origami & Feathers

It was my turn to come up with the challenge over on Daring Cardmakers this week. I keep noticing Origami inspired designs in some of the newer paper craft lines and so I thought I'd pick out Origami as the inspiration/starting point for this weeks challenge. There are so many cool Origami projects online that translate well for embellishment making. 
When I was having a go at following some of the online instructions I did find that the weight of paper you use makes a big difference, you need something in between a light to medium weight. I ended up finding regular printer paper the easiest to use so for my card I printed some text onto the paper first to make a background and then used the Origami heart instructions to make the heart shape embellishment. I wanted to make use of some of my Pinterest ideas again too and so I had a go at pencil eraser stamping and made a kind of faux confetti background. It's so simple to do, just a case of using a couple of erasers on the ends of pencils, daubed in the ink pad then stamped straight onto the card base. Dye based inks worked best after I had a little play so I used Memento and Impress ones.


The card I made for last weeks challenge was another Pinterest idea I had saved, making feathers from washi tape. All you do is stick a piece of twine or thread onto the sticky part of the tape then stick another piece of tape over the top so you sandwich the thread inside like the 'spine' of the feather then just cut it to shape and snip down the sides for the feathery effect. I guess if you didn't want them to dangle like I used them to make a mini dreamcatcher embellishment you could use some thin wire. If you have some off cuts of wired ribbon, the wire in something like that if you extract it out would be perfect.


 Don't forget to have a go at the Origami challenge this week! http://www.daringcardmakers.blogspot.com
x Leo


25 April 2014

It's Elementary

This week on Daring Cardmakers it's Nat's turn to come up with a dare and she's set us the challenge of creating a card using at least three elements from this image:


I started out by going through my supplies and pulling out lots of bits and pieces and then ended up driving myself potty trying to jam it all onto one card. In the end I pulled most of it off the card and here's what I ended up with:

The stripy paper I really love, it's one from the Fancy Pants As You Wish collection and I've used 2 sheets of it already, it's one of those goes with everything papers, (and I know it's a bit darker than the turquoise on the image but I'm still counting it as turquoise!) Obviousy there's also pink from the image, a hot pink and a lighter one. Rose images, cut out from a MME patterned paper and the wooden paper is a piece from a Studio Calico one called Napa Valley. Both those papers are on my desk already as they're in the new Quirky Kit Lite I've been playing with. There's some Prima leaf embellishment and more little paper flowers that I glued some pearls on to too. The little bow clip and the butterfly die cut are both Crate Paper from the Maggie Holmes line. The final bit was the greeting which I cut out of Cosmos Cricket paper and I've added the little button on top of the o. Hope that's enough of the elements! 
Have a dig around your supplies to see what you can find inspired by the image and share what you've made over on the Daring Cardmakers blog, http://daringcardmakers.blogspot.com
x Leo

14 April 2014

Flags & Miniatures

This week on Daring Cardmakers Lythan has tasked us to make a card inspired by a national flag.
I had a think about it and Google image searched for national flags to get some inspiration and decided to go with the Canadian Flag as it stood out to me as being one of the most decorative with it's Maple Leaf design. I picked out the Maple leaf and cut some leaf shapes out from papers sticking with the red and white theme like the flag. One of the leaf shapes I covered with gold leaf and I picked out some red and gold accents to mix in. The little bag at the back has a envelope in it for money as I thought it would make a more unusual wedding card.


Here's the card I made for Daring Cardmakers last week. The theme was a colour board of red, green and grey. I had some new papers and goodies out on my desk from the new March/April Quirky Kits which were already red and grey tones so I picked out some of those and then ended up in my Christmas paper scraps box for the green. I went with poppies as the red/green colours made me think poppies but I ended up making them miniature because of the paper scraps sizes I think and so that led to the whole of the paper cut outs being miniature. I used another one of the large format card, (it's a 7x7 inch one) so it made a fun contrast in the end. It's made me want to try something like this on a scrapbook project too.

Don't forget to check out this week's Daring Cardmakers challenge to get some awesome inspiration as always, http://www.daringcardmakers.blogspot.com

x Leo

21 March 2014

Daring Cardmakers Docrafts Challenge - Dies

Hi!
This week the Daring Cardmakers challenge has been sponsored by Docrafts. Docrafts generously provided all the Daring Cardmakers with a set of dies from their comprehensive selection. I was sent a 'Carnival Numbers' die set. You can view the details on the Docrafts site here.
Here's the card I made with the dies:


I read on the packaging that the dies can cut 2mm foam and that triggered me to dig out my bits of craft foam from my supplies as a starting point. I dug out this really cool Darice glitter foam and cut out the numbers from it. I used my Cuttlebug with plates B and C and it cut out really well with a couple of rolls through. These large kraft card blanks you can get from Docrafts too, they're the Papermania ones. I had those already so used one as a base and then built a banner up from scraps of patterned paper and pieces of ribbon. I added some lilac bits of ribbon to finish the banner and make it nice and girly and then finished off with some little enamel dots and stick on gems.
Dig out your dies and have a go at the Daring Cardmakers challenge this week! http://daringcardmakers.blogspot.com
x Leo

7 March 2014

More Daring Cardmakers Cards

Just catching up with my last few Daring Cardmakers Cards.
This week it's a colour challenge. Check out all the details on the Daring Cardmakers Blog, http://www.daringcardmakers.blogspot.com
Here's the colour selection for March:

And here's the card I made for this week's challenge:


I started with how I always do with these colour challenges and raided my box of paper cut offs. The only one I had with that dark peachy/orange colour was this floral one which I think is Sassafras but not sure because it was an off cut. It also had the green and blue colours in there too. I've picked out the dark teal colour with the little bit of Crate Paper paper at the top of the card and with the ribbon near the bottom. The little strip of paper at the bottom is a Basic Grey one both from past Quirky Kits which I've sorted through recently and added to my off cuts box so I can remember those!

This is the card I made for last week's challenge which was to make words the main bit of the card and use words that meant something to you. I used a Gandhi quote I liked, 'In a gentle way you can shake the world'. To me it means just one little thing can make a big difference, like how a little drop of rain can make a seed grow and that could grow into a huge big tree that goes on to make a whole big forest. Ohh I'm getting all philosophical now! I just had to spell check that that's how philosophical I am usually. :)


x Leo

21 February 2014

Old but not forgotten

This week for Daring Cardmakers I had to dig out some old supplies to use on a card. I initially thought I'd go with tools as I tend to clear out older paper I'm not using. That's not to say I don't have any though! I bet there isn't a crafter out there who hasn't got a few dodgy bits and pieces lurking in the back of the cupboard. Come on admit it, you bought one of those somethings that was 'such a bargain' or 'looked like a must have on the TV shopping channel demo' that's long since lost (or never really had) it's appeal. :)
Anyway getting back on track I was thinking on how to approach this challenge and I first went digging for old tools but then thought about old scrapbook papers. When I do clear out supplies I'm often loath to get rid of full sheets of scrapbook papers and there's a few that have missed the cul quite a few times so I decided to dig those out and see what I could come up with.

Funnily enough they're nearly all black and white. I think this is because when I am crafting I use colour to pick out supplies and black and white never falls into that. Most of these say 2007 on them so I guess that's how old they are. The Urban Lily company I don't even think are around any more. Most of these are actually paper too, if you can remember when scrapbook papers actually used to be paper weight! I'm glad they're not any more though I do prefer a cardstock weight. Also on my desk at the moment are some of my newest supplies from kits so I ended up mixing in some of those cut off bits so I've ended up with a mix up of oldest and newest.


Here's the first card I made. I used the very old Urban Lily paper and added a little bit of new Basic Grey paper, the flower pattern is almost the same so I think it worked. I liked it just peeking out from the top too, like it's carried on growing. I think the fact the pattern on the Urban Lily paper was so 'established' already it's always been difficult to think what to do with it, it's not one of those full patterned sheets you can just grab and chop up and layer.
I also added some butterflies punched out from mirror card and matched that to some newer Lawn Fawn silver twine. It's quite funny just how many 'older' things you can match up with newer.

Another one made with another mix up of old and new:


This next one I've included because we were chatting among Daring Cardmakers about how long it takes to make a card or if you make a card and give up on it and start another one. I was saying about if I've used something painty or inky and it's not worked or I don't know what to do with it I'll ditch it. Well I've got this card this week that I started and then just couldn't work out how to finish. I tried using some old handmade paper and the black and white scrapbook paper, decorative edged scissors and a paper ribbler. I liked the texture on the paper, (the ribbler made it like a paper lantern texture) but I wanted more colour so I added some spray inks but now it's just like this and I just don't know where to go with it from here.
x Leo

14 February 2014

A Pop of Neon - Daring Cardmakers

First up sorry for not updating my blog in a while it's been neglected this year so far but I'm onboard to try and stay up to date for a bit. 

This week it's been my turn to set the Daring Cardmakers dare again and I've set the challenge of using a little 'pop of neon' colour on a card. I also sent out some little bundles of Quirky Kit goodies for the design team to use so do check out the fab cards the design team came up with over on the DCMers blog as there's such a wide range of inspiration to pick out from, http://www.daringcardmakers.blogspot.com

Here's the card I came up with:


I started off layering up some patterned paper pieces together on the front of the card mixing in a little bit of Bazzill Electric Yellow cardstock which is amazingly neon, it's like those neon post it notes yellow! The top embellishment is a Kesi'Art sticker and then the bottom embellishment is made from wire with twine wrapped around it. I printed out the greeting on graph print paper to put inside the wire heart shape.


I took a little photo of the embellishment as I made it. It's just wire which was in my jewellery making stash that I bent into a folk arty heart shape then wrapped the neon pink twine around it and tied the ends together then added some Glossy Accents to seal up the knot. If you were really clever with wire you could make words this way too or other little embellishment shapes. I picked a heart to match the Teresa Collins heart print paper I used.

Don't forget to have a go at this week's Daring Cardmakers Challenge, If you make a card and link it up before next Friday you can win a kit of Quirky Kit goodies too!
x Leo