25 January 2010

Reuse, recycle and create

Finally I'm able to get started with the first page in my 2010 album. I had a think about how to get started and looking around found some goodies I'd save from Christmas that 'could' be used for crafting. I'm sure most crafters have these moments where we save things that look like they could have a crafty second life. If you do it's defo a good starting point for a page I think. I picked out some packaging that as well as being pretty has a decorative shape. I'm going to use this shape as a template for my page. Along with the packaging I picked out a photo to use and some card to use as my base.


I've used the packaging to make the page shape, drawing around it across the top and bottom. The page size is dictated by my album so I measure that first and cut a page to fit. I've borrowed th colour scheme from the packaging too which has helped me to pick out the paper. This paper is one from the Collage Press Joyride collection. I've matted my photo on to pink card and inked around the edge of the page with silver ink. I'm not sticking my photo on my page yet I'm going to play around with it first before I stick it down.


After a little bit more decorating my page is finished. I've used some alphabet stickers and made some embellishments with lace. It's now ready for the album. To add it to my album I just punched some holes in the shaped page. A shaped page could also go on top of or inside a page protector.


On the back I've used a label stamp and added some journalling.


Crafting for all group recap: Use something from your craft goodies or around the home as a starting point for your page. Cut your page into a shape other than a square. Have fun!

xx Leo

9 January 2010

2010 Scrapbook Stage 2

Today I made a start on the second stage of my 2010 scrapbook. I wanted to make dividers for each month inside my album so it looks more like a journal. If you want to follow along this is what I did next.

I love freestyle scrapbooking so I went along with that style for my dividers, you can taylor how you make yours to your own style. First I used one of the page protectors inside my album as a template. I'm using a very neutral kraft coloured card for my dividers so I can decorate them as I go along in the year. I cut the pieces of card so it was slightly longer than the page protector then freehand sketched out the edges in pencil. I want to make tabs on each page so I sketched that on too.

Next I sketched over the top of the pencil using a Sharpie marker pen. Then used a date stamp to add the date to the tab.


The page was then cut out and the holes marked on using the page protector as a guide.

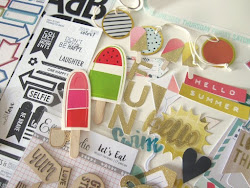
Because this one is January I want to decorate it right now so I picked out some patterned paper, chipboard stickers and alphabet stickers to use and built up the design. You could just cover over your dividers with patterned paper if you wanted to although it is fun to make a design.


I'm using things I had leftover from Christmas for this first page so you could raid your leftover Christmas stash or cut up Christmas cards etc. Anything with snow would be good for this time of year.


Once that's done the holes are punched in and it's into the album.

If you're making dividers for your 2010 scrapbook you need to make 12, one for each month. Keep them in a similar style and use plain card so if you cover it up completely as you go along decorating your album it won't matter so much.

Keeping my album organised like this I'm hoping it will encourage me to fill some in each month and not be tempted to leave any gaps as the months go on.

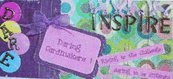
I also added this cute tag to the inside. I think it will be nice to tie bits and pieces inside the album as I go along.

So for Crafting for all ers playing along your next mission is to make some dividers. If you didn't want to divide your album up by months you could pick other subjects to organise your book into. Next week we'll be starting the first page inside the book!

Oh, I also added a bit more to my cover because I thought it looked a bit too boring. My plan was to keep it quite plain but I just couldn't get along with it. I think it looks much more interesting now.

xx Leo

6 January 2010

2010

Yikes, how scary is it to think we're into 2010. Last year almost just swept by for me so I'm starting this year with a plan. I had lots of fun filling in my December daily album during December although I have to admit I found it difficult to get a page done every day. I also started other projects at the beginning of last year with the intention of carrying them on through the year but didn't make it past March. With all this in mind I've made it a resolution to this year definitely make a scrapbook journal throughout the year and I've made it as easy as I can think of.
One of the main factors I've come across with these year long projects is time so I need to have a schedule to make me produce the pages but one that's not rigidly fixed. The simplest way I could think of is to do one page around the beginning of the month and then one page at the end of the month. Sounds simple so far? I also found getting the album ready and dedicated to one project quite a pull to make it complete so I set about making the album ready. I'm not going to add much to each of the inside pages at this stage because I want to use things I find along the way, (it's also a great excuse to purchase some new goodies as I go through the year!) and make each of the pages completely unique not following any particular style or colour scheme.
I've started with a blank 6x6 American Crafts ring bound album and I picked out some American Crafts papers, chipboard Thickers and Jenni Bowlin stickers to decorate it with.


This is what I ended up with.


The next job is to make dividing pages for each month and since I'll need two pages for each month I need to make sure there are 24 sides or pages inside my book. After that it's down to filling up the first page!
Happy new year!
xx Leo

P.S For any Crafting for All group playing along I think Pat is going to be keeping a link in the important info bit in the group. I'll update when I've made up the inside bits but for now it's about getting a blank album you want to use ready. xx