I came up with this idea from the fabric pencil crayon wraps people make, I thought that would make a cool storage case for the little Nintendo DS cartridges that end up everywhere, so I set on making one. I played around with a piece of fabric, {it was just shy of a fat quarter size, doubled over} and decided to make a wrap with two pockets on either side, one for the DS itself and one to keep the little cartridges in.
 These are quick diagrams to try and show how I made it, the first one is how the fabric is folded, you need to start with a doubled over piece of fabric cut so you have a long rectangle shape.....
 Then you need to fold over each end to make the pockets, the side on the left is folded over about 3.5 inches and the side on the right is about 4.5 inches. You need to leave a gap in the center of the wrap so you can pull out the DS and cartridges from the pockets.
When you've pressed the pocket folds all you need to do is stitch it together. I included stitching along the folded edge, it doesn't need it but it just makes the whole thing look neater. I also used some American Crafts ribbon as binding along the pocket edges to make them a little more hardwareing. You need a good long length {about 36 inches long} of ribbon or thonging for your closing and that needs to be stitched into the pocket of the left side of the wrap.
 The dashed areas show the stitching around the pockets. To finish off thread a button on the end of the closing and tie a big knot in the end to secure it.
  Here's my wrap all opened up. To close it you just fold it over and wrap the closing around then tuck the button under.
 If you have any to pass on I would love some shares of other projects, I've got a stack of cute fabric waiting to be used.
xx Leo
P.S if you're here looking for the blog candy draw it's in this post and you have till the 1st of Feb to enter the draw. xx
 I just sketched out the shape of kittys head on some core-dinations black magic card and then embossed it with the Cuttlebug swiss dots folder then rubbed it back. Added on the features then made a background with some patterned paper off cuts and some more core-dinations, this time torn to reveal the core colour. Jammed the whole thing together and finished with the chipboard heart and the tape writer message.

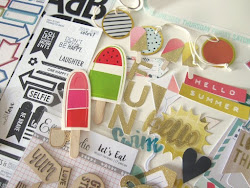
 OK on to blog candy business, I did say that I would do a give-away when I got to my 100th post so here is what I came up with. I plundered the office draw that has a load of spare goodies in from past Crafty Templates kits, added a few extra bits and pieces and made up two kits to giveaway!
 2. Project fun-ness
 Nothing complicated to do just post bellow Boys are cool {if you want the boy kit} or 'Projects Rule' {if you want the project kit} and I'll pick two winners out at random. E Z P Z!